Step 1
Photograph the whole workspace
Stand where the photo shows the desk wall, window, doorway, floor area, and any shared-room furniture. Avoid a close crop that hides glare sources or walking routes.
Upload a photo of a dedicated office, spare room, or shared corner to explore a more focused workspace. Compare desk placement, lighting, storage, call backgrounds, and furniture before building a measured shopping plan.
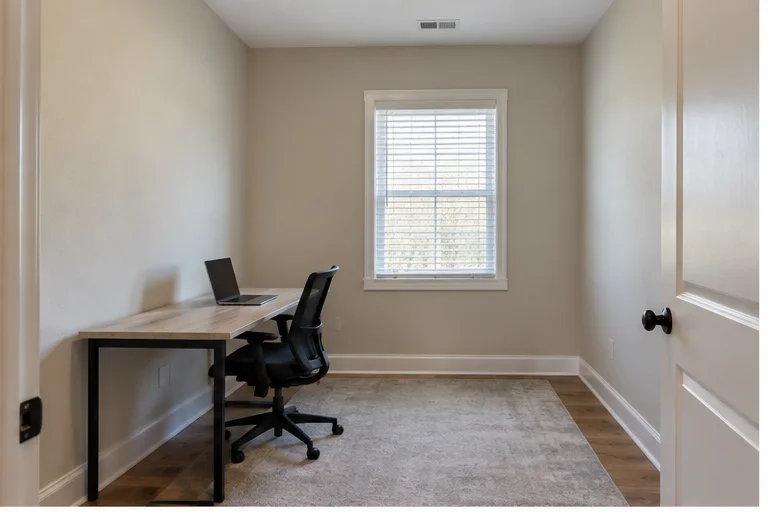
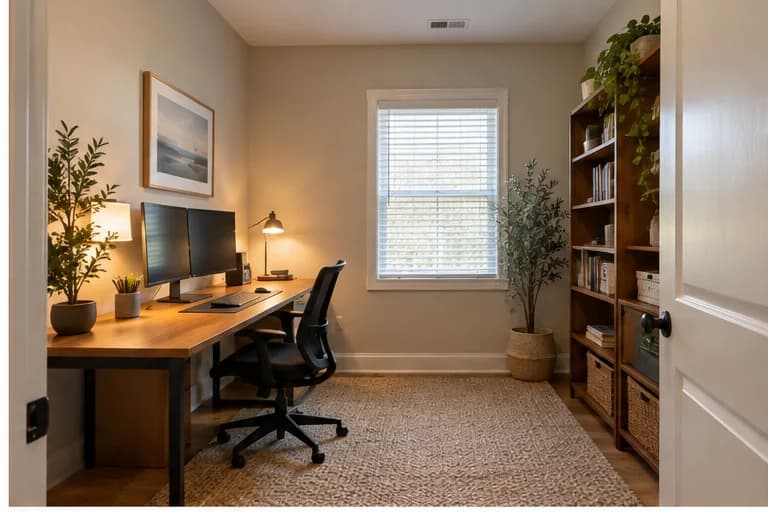
This illustrative pair keeps the room opening and window while testing a larger work surface, closed and open storage, task lighting, and a calmer background.
Use the concept to compare the room as a complete working environment. Then verify the desk, chair, screen, light, power, and storage choices against your body, equipment, and real dimensions.
Stand where the photo shows the desk wall, window, doorway, floor area, and any shared-room furniture. Avoid a close crop that hides glare sources or walking routes.
Select the home-office room type, list the equipment and furniture that must stay, note whether calls or focused work matter most, and include storage or rental restrictions.
Check daylight direction, screen glare, chair movement, desk depth, background for calls, reach to storage, cable routes, and whether the door and walkway remain clear.
Measure the user, desk zone, chair clearance, screen position, outlets, and storage wall. Compare those facts with product specifications before purchasing anything shown or suggested.
A dedicated office and a shared living-space corner need different solutions. These examples focus on work surface, storage, lighting, visual calm, and the relationship with the rest of the home.
Illustrative example. Dedicated room with window, doorway, and main work wall retained.
The concept tests a wider desk, dual screens, layered task light, book storage, plants, and a rug. Confirm desk depth, chair travel, monitor support, power access, and the actual brightness of the window.
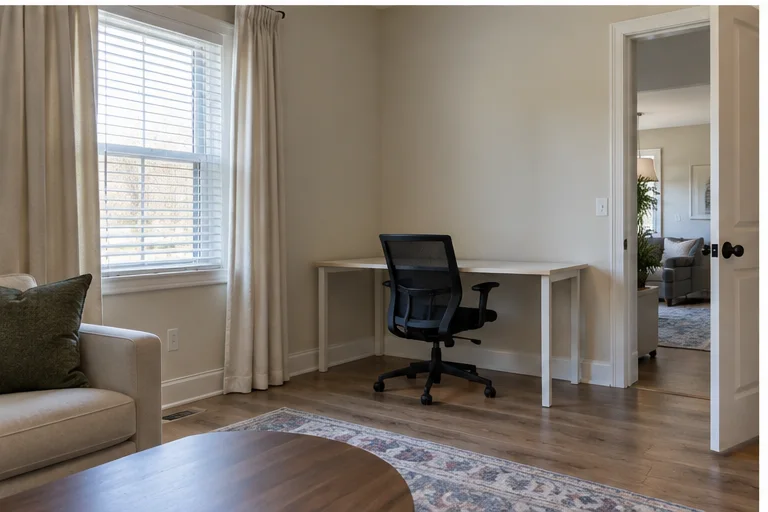
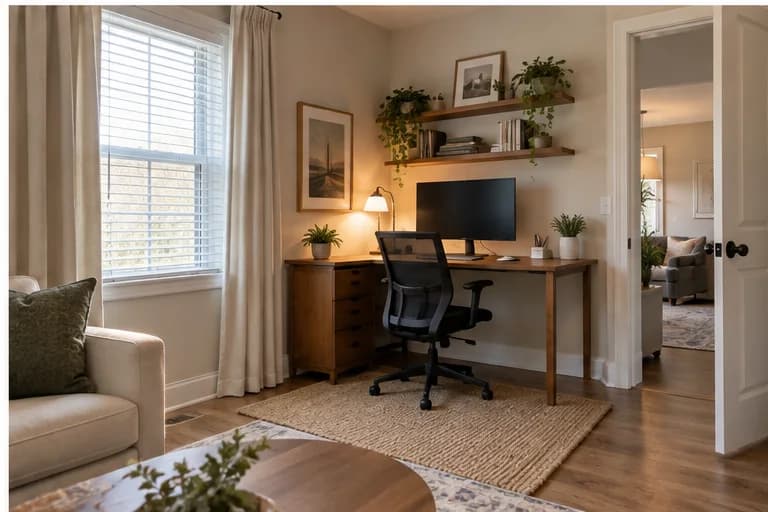
Illustrative example. Compact work corner connected to a living space.
The redesign uses a more useful desk, task light, shallow shelf, and visual boundary without closing off the adjacent room. Check circulation, chair clearance, screen glare, and how work equipment is hidden after hours.
A polished workspace is only useful when it supports the actual workday. Review these functional details before turning the concept into purchases.
Place the work surface where doors remain clear and equipment fits without crowding. Verify depth for the screen distance, keyboard, writing space, and any dock or speakers.
Check seat range, armrest clearance, floor protection, and the space to roll back and stand. A rendered chair does not confirm fit for a particular person.
Keep screens away from direct glare and confirm that stands or arms support the real monitor weight. Adjust height and distance to the user instead of copying the image literally.
Balance window light with an adjustable task light and softer ambient light. Test the room at the actual hours when work happens, not only in daytime photography.
Plan safe access to outlets before choosing the desk location. Avoid stretched cords and overloaded adapters, and use a qualified electrician for new outlets or hardwired lighting.
Review what the camera sees, where household traffic passes, and whether acoustic or visual privacy matters. Storage behind the chair should stay tidy and securely anchored.
Use the visualizer to create a clear work zone without making the whole room feel like an office. A rug, compact desk, closed storage, wall-mounted task light, or restrained finish can separate the function while keeping the surrounding room coherent.
For a shared or rented room, prioritize freestanding storage, cable control, a movable task light, and furniture that can serve another purpose later. Keep the bed, sofa, doors, and primary walking route visible in the source photo.
Plan a renter-friendly workspaceGroup the concept into desk, seating, screen support, lighting, storage, cable control, and sound or call accessories. Tools like Airender can help connect a chosen direction with visually related products for the selected market.
Confirm product dimensions, load limits, adjustment ranges, materials, power requirements, merchant availability, returns, and delivery. Ergonomic needs vary by person, so an image cannot guarantee comfort or prevent injury.
Compare AI room tools with shopping listsA home-office render does not know the user's body measurements, vision needs, health conditions, daily work duration, equipment weight, outlet capacity, network quality, or fire-safety requirements. Use the image as a layout hypothesis, then adjust the setup with real measurements and appropriate professional advice.
Understand how a photo becomes a whole-room visual concept and what to verify.
Prioritize reversible, portable choices when the workspace is in a rental.
Compare item-level furniture visualization with a full workspace redesign.
Compare tools that help move from a visual concept to product research.
Compare a layout in the actual room, then verify comfort, dimensions, power, and product specifications before buying.
Practical answers about layouts, shared spaces, shopping, and the limits of a generated workspace concept.
Yes. Upload a clear photo and select the home-office room type to explore a visual direction for the desk, seating, lighting, storage, decor, and overall style. Verify measurements and equipment requirements separately.
Yes. Include the surrounding room in the photo and explain that the workspace shares another function. Review circulation, visual separation, storage, and how the office looks when the workday ends.
No. Desk height, chair adjustment, screen position, keyboard placement, and viewing distance depend on the individual and their equipment. Measure and adjust the real setup rather than copying a generated image exactly.
Airender can surface visually related products for the selected market. Confirm dimensions, adjustment ranges, weight limits, materials, electrical requirements, stock, delivery, price, and return terms with the merchant.
Use a level, well-lit photo showing the desk wall, window, doorway, visible floor, and nearby furniture. Avoid a close crop that hides glare sources, outlets, or the route through the room.
Yes. Focus on freestanding desks and shelves, rugs, lamps, cable organizers, curtains, and portable acoustic treatments. Get approval before drilling, painting, mounting heavy equipment, or changing electrical fixtures.
Compare AI design tools, estimate furnishing costs, and turn one room photo into a practical plan.